Table of Contents
Introduction
EL Wire, also known as Electroluminescent wire, is a stiff wire core coated with phosphor and then covered with a protective PVC sheath. When an AC signal is applied to it, it glows an aqua (blue green) color. Sometimes its covered with a colored plastic shell to make it appear another color. It looks a little like thin neon. Very bendable, it keeps its shape and you can curl it around your finger. Its an easy way to add some glow to a project, not as bright as LEDs but uses a lot less power!
It's often used for costuming, decoration, accent lighting, safety vests, bicycle/motorcycle/car/boat/home decoration, signs, etc. It's definitely the most popular wearable electronics we've seen since its so easily to use.
We have two EL project tutorials - the TRON-inspired bag and the EL wire party couch!
You can pick up some high-brightness, long-life EL wire and inverters at the Adafruit shop
Quickstart FAQ!
If you aren't going to read the rest of the tutorial, here are the important parts to note:
- EL is 'cold' - the wires generate no heat!
- EL wire requires a driver/inverter that can provide 400-2000 Hz, 60-120VAC (that's RMS not peak-to-peak!)
- Higher frequency/voltage results in a brighter wire
- Running the wire brighter will lead to a reduced lifetime (how many hours it takes until its half-brightness)
- Our high-brightness/long-life EL wire can be driven at 100V/2000Hz for 3000 hours before it is half the original brightness
- EL wire is capacitive, and cannot be PWM'ed or easily dimmed (unless you can adjust the voltage/frequency of the inverter)
- The more wire you connect to an inverter, the more 'loaded' it is and the dimmer it will be
- Our AA pocket driver can drive about 2.5 meters before it starts dimming significantly. 2 meters is a good amount, 3 is OK but wont be as bright.
- If you 'split' and connect more than one piece of EL to an inverter, count the total length of all the pieces
- The AA inverter works best with fresh batteries, but you can use rechargables - it'll just be dimmer because the input voltage is lower.
- The capacitance 'load' of the EL is required to stabilize the inverter so never run the inverter without at least 1 foot of EL attached!
Please note! EL tape, EL wire and EL panel are made with different processes and so the color and brightness will not be consistant between the two: aqua tape, aqua wire and aqua panels will not necessarily match!
Soldering to EL wire
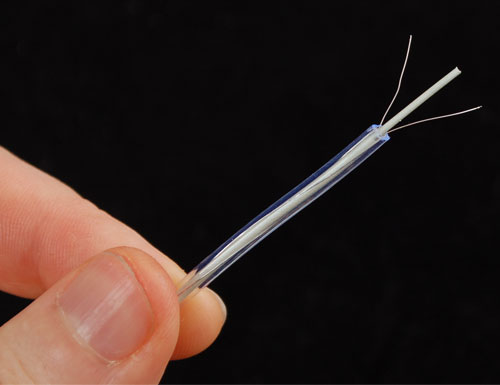
EL wire is a little tricky to work with. It is made of three wires, one large middle wire and two very thin 'corona' wires. In the closeup above, you can see the two thin wires wrapped around the core. These two sets of wires are the leads we must solder to. But first, we have to get to them!
You'll need the following tools and items:
- Copper tape
- Heat shrink in 1/4" and 1/8" diameter, 1:2 or 1:3
- Heat shrinker, Heat gun, hair dryer, lighter, you can also just use the edge of your soldering iron
- Utility knife, hobby knife (x-acto), box-cutter, razor blade, etc
Start by cutting the wire to be as long as you want, and add an inch (or if you're starting out, a few inches) for the wire connection. Remember, its very easy to make the wire shorter but hard to make it longer!
Next, we'll need to remove the outer coating. This is the hardest part of the process so don't be disappointed if it takes a few tries to get it right! Use the 20 AWG or 18 AWG slot and strip off the PVC coating about 1/2" (1 cm) away from the end.
If you accidentally cut off one of the corona wires (or both) cut the core and try again.
If you arent succeeding at getting the PVC off without damaging the wires, you can try not-quite-closing the cutters all the way (the image below is an exaggeration of how much to close it) and giving it a good yank.
Upon success you should have three wires sticking out
Make sure you really didnt damage the corona wires by giving each one a gentle tug
OK place the end of the wire in your third 'helping' hand tool, essential for all kinds of wire soldering
Next, cut a 1" or so piece of 1/4" copper tape. Dont use scissors to cut copper tape, use wire cutters!
Unwrap a few mm of tape from the backing and stick it right next to the edge of the stripped EL wire. Fold the two thin wires on top
Heat up your soldering iron to 650 degrees F and make sure its hot by melting solder onto the tip, it should melt easily.now press the tip of the iron to the two wires and copper tape and quickly dap some solder in.then remove the iron. This should not take more than a second or two or the EL wire casing will melt.
Check that the wires are soldered to the tape.
Now wrap the remaining tape around so that it covers and protects the solder joint.
Cut it so that it wraps around once, you dont want it too bulky.
Now that the corona wires are tucked away safely, we can work on soldering to the middle wire. First we must remove the phosphor, by scraping it off. Some people use a lighter to burn it off but we like to just scrape it with a razor. Either way, remove some of it
You don't have to remove all of it, just half of the wire is fine.
Now tin the wire by heating it up with the soldering iron tip and melting solder onto the wire, this will coat it with solder - makes it easier later to solder on the wire
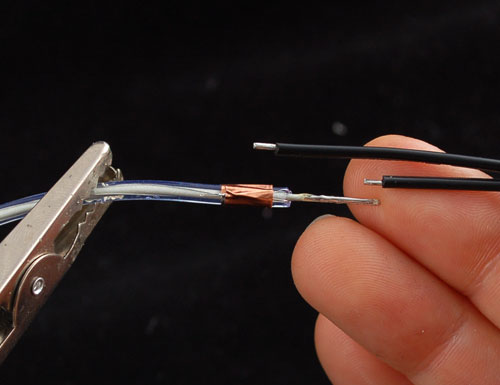
Next get your wire ready, ours come precut and tinned. If not, cut so that one side is about 1/2" longer than the other tin the ends. EL is AC-powered so you dont have to worry about 'polarity'
Before you solder it on, get a piece of 1/8" heat shrink and cut it so its as long as the middle wire piece (1/2" or so)
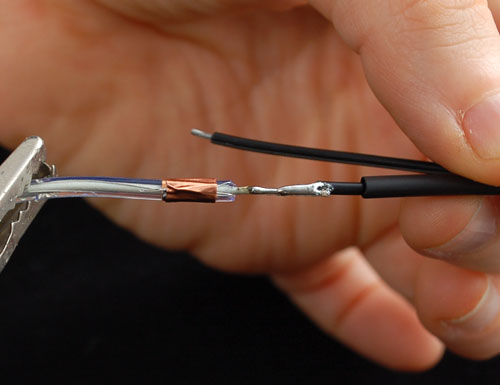
pull the wire apart so that you can slip the heat shrink on and have 1/4" or more of clearance from the end of the wire, otherwise the soldering iron will prematurely shrink it. Solder the wire to the middle conductor.
If you're having problems, go back and tip both wires with plenty of solder so you can just heat them up while touching!
After 15 seconds check that the solder connection has cooled, then slide the 1/8" shrink over the middle joint.
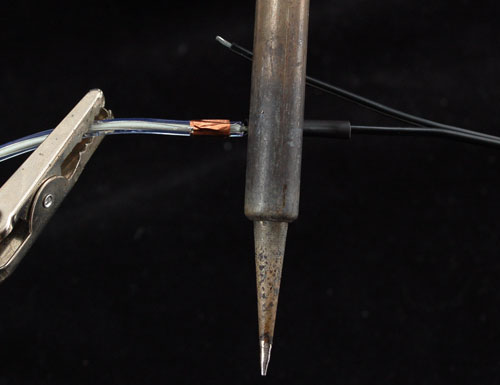
Now you have to heat up the heatshrink to get it to shrink. You can use a heat gun, hair dryer, hold it above a lighter (carefully!) or you can try 'rubbing' the non-solder part of your iron gently against the shrink.

When done correctly the middle wire will be completely protected
Now we can revisit the corona wires. Using the tip of the soldering iron, heat up the copper tape and melt a little solder on
Then solder the other wire to the copper tape
Slide a 1" piece of 1/4" heatshrink from the other end of the EL wire
Use your heat gun again to shrink the heatshrink over the whole assembly, to protect it.
That's it! You're now ready to plug the El wire strand into an inverter.
Drivers
To power EL, an AC source is required. It is not possible to light up EL with DC such as batteries or a wall-wart adapter! The output of the inverter must be a sine-wave with no DC component. It is not unusual to have an inverter run from batteries, such as this 'pocket' AA driver. The inverting circuitry is inside the box part to the left.
This pocket inverter can drive approximately 1 to 15 feet (0.3-5 meter) of 'classic' EL wire such as LyTec. Since we are using higher-brightness EL wire in the shop, it can only drive half as much, 1 to 7.5 feet (0.3 to 2.5 meter). We found that 2 meters gives a nice bright glow at good voltage and frequency. At 3 meters, its not as bright, it appears about the same as 'classic' EL.
Each meter of high brightness EL draws about 10-15mA at the high voltage, which means about 1.5 Watt/meter (at 100VAC). 2 AA batteries can provide 9 Watts, so you can drive 1 meter for about 6 hours or 2 meters for 3 hours. This is only approximate, as the voltage changes with the length. The best way to know how long the wire will last is to test it with batteries and time how long it takes to dim!
All EL drivers run at 'audible' frequencies which means that you can hear a squeaking noise emanating from the driver case. This is totally normal, but a little annoying. You can reduce the squeaking by opening up the driver case and padding it with foam tape. You can also try wrapping it in bubble-wrap or foam sheet to reduce the noise. We've usually found people wearing EL wire at parties where it's quite loud already
EL wire modeling
EL wire is not a resistive light (like an incandescent bulb) and it is not a diode light (like an LED), it acts like more like a capacitor! The stiff inner wire is one 'plate' of the capacitor, the corona wire is the other 'plate' and the phosphor coating being the insulator/dielectric (for more details on capacitors, see Wikipedia). This means you cannot use dimming methods such as triac/chopping for resistive incandescents or PWM for LEDs.
In terms of thinking of how EL wire 'acts' you should model it as a capacitor that increases with the length of the wire. It is not a perfect capacitor, there is also some leakage which we will model as a resistor.

Adding another meter, we duplicate the RC model in parallel

Of course, we can simplify by calculating the new capacitance and reistance. Remember that capacitance increases in parallel and resistance decreases

The capacitance and resistance per meter depends on the 'thickness' of the EL wire, the brand and make, the voltage and frequency applied
For ELAM Lytec 2.3mm EL wire (which is the most common EL wire) the parallel resistance per meter is:
| Voltage | 200 Hz | 400 Hz | 800 Hz | 1000 Hz | 2000 Hz |
|---|---|---|---|---|---|
| 5 | 1,504 KΩ | 1,043 KΩ | 663 KΩ | 569 KΩ | 314 KΩ |
| 20 | 1428 | 942 KΩ | 592 KΩ | 494 KΩ | 259 KΩ |
| 40 | 1175 KΩ | 691 KΩ | 393 KΩ | 316 KΩ | 165 KΩ |
| 60 | 886 KΩ | 510 KΩ | 280 KΩ | 235 KΩ | 123 KΩ |
| 80 | 709 KΩ | 435 KΩ | 243 KΩ | 200 KΩ | 107 KΩ |
| 100 | 572 KΩ | 374 KΩ | 226 KΩ | 184 KΩ | 101 KΩ |
| 120 | 480 KΩ | 323 KΩ | 210 KΩ | 174 KΩ | 94 KΩ |
And the ELAM Lytec 2.3mm EL wire capacitance per meter is:
| Voltage | 200 Hz | 400 Hz | 800 Hz | 1000 Hz | 2000 Hz |
|---|---|---|---|---|---|
| 5 | 5.1 nF | 5.0 nF | 4.9 nF | 4.9 nF | 4.7 nF |
| 20 | 5.1 nF | 5.0 nF | 4.9 nF | 4.9 nF | 4.8 nF |
| 40 | 5.3 nF | 5.1 nF | 5.0 nF | 5.0 nF | 4.9 nF |
| 60 | 5.6 nF | 5.4 nF | 5.4 nF | 5.3 nF | 5.2 nF |
| 80 | 5.9 nF | 5.8 nF | 5.7 nF | 5.7 nF | 5.6 nF |
| 100 | 6.3 nF | 6.2 nF | 6.1 nF | 6.1 nF | 6.0 nF |
| 120 | 6.4 nF | 6.3 nF | 6.2 nF | 6.2 nF | 6.1 nF |
The 'high brightness, long life' EL wire we carry is about twice as bright and has about twice the capacitance.
Current draw
We can use this information to determine the power draw.
Assuming you have LyTec EL wire, 2.3mm diameter 'standard'…if have one meter, that is 6nF and 100KΩ in parallel. The capacitance has an impedance of 1/(2πfC) so at 2000 Hz, the impedence per meter is 12 KΩ, in parallel with 100 KΩ it is 11 KΩ total. For a 100V AC power source, the current draw is 100V/11KΩ = 9mA per meter. 100V * 9mA/meter = 0.9 Watts/meter!
If you are using our 'high brightness, long life' stuff, its about 1.5 Watts per meter.
Thus an inverter with a 100mA output capability can drive 10M or so of LyTec and 5M of 'high brightness' EL. The transformer and transistors used in an inverter are a big part of how much current an inverter can provide!
Inverter / Driver (Details)
To power EL, an AC source is required. It is not possible to light up EL with DC such as batteries or a wall adapter! The output of the inverter must be a sine-wave with no DC component. It is not unusual to have an inverter run from batteries, such as this 'pocket' AA driver. The inverting circuitry is inside the box part to the left.
The voltage should be between 50-120V AC RMS (150V-360V peak-to-peak). Higher voltages result in a brighter display (but lower overall wire-life).
The AC frequency can run from 60Hz to 2000Hz, higher frequency results in a brighter display (but lower overall wire-life). Most inverters run at around 100VAC and 2KHz. This will vary a little bit with how much wire is attached, as longer pieces will 'load' the output.
For example, this is the output of our pocket inverter with no loading. It is about 7KHz and 120V, the frequency is a bit high because the output is expecting a capacitive load that is not there. (Don't do this yourself, it can damage the inverter!)

Attaching 3 meters (10 feet) of high brightness EL wire, the frequency stabilizes at 2KHz and 65V, which means we've about maxed out what this driver can provide.

If you are comfortable using tools want to optimize your driver and wire, you can do so by 'modeling' your EL wire with a capacitor and resistor and plugging that in, then measuring the frequency across the RC with a multimeter or scope, just watch out you don't zap yourself!
The most important thing to note is that without a load capacitance/resistance, the voltage output can peak very high, up to 400Vpp! This will damage the pass transistors and for this reason you should never run an EL inverter without EL wire attached
Another thing is that the more EL you add, the dimmer it will get as the voltage sags.


