This is an old revision of the document!
Table of Contents
Brother KH-930e knitting machine
Adventures in communicating with the Brother KH-930e knitting machine!
Make your own cable
The kh930e is designed to work with a Tandy PDD1 floppy drive. We don't need it! Make your own cable to communicate between your computer and the machine. You will need:
- 2x4 connector part number WM8036-ND on Digikey
You will need to make some minor mods to get the cable talking to your knitting machine. Follow the tutorials to get your knitting cable going
Change 'polarity' of the FTDI cable
FTDI cables have standard 'inverted' TTL (zero is 3-5V and one is 0v) but the KH930E requires the opposite. Luckily its very easy to fix this by reprogramming the software.
You will need a copy of FTDI MProg (windows only) and your FTDI cable. Plug in the FTDI cable into your windows computer and install the driver that matches your computer best

Please read our detailed tutorial on installing the driver here then come back when the driver is installed
Now download FTDI MProg and run the program

Select Scan… from the menu

The message window should say it found a cable

Now select Read and Parse to read in the cable programming


Click the buttons that say to Invert TX and RX

Here is the wierd thing, you have to Save as… the settings so just save it anywhere

Now you can click the Program button (lightening bolt)

The message window will say it programmed

You're done! Quit Mprog
Rewire the connector
Next we need to rewire the FTDI cable to match the pinout of the knitter. The cable comes with a 1x5 connector, but we need a 2x4 connector

Use tweezers to lift up the black connector tabs

Then gently pull out the wires


Python code
Now that you have the cable running, its time to download the software. Visit the Adafruit github repository and click on Download to download the source code.
This code is based on Steve Conklin's knitting machine code which is totally awesome but doesn't support pattern insertion. Still, check out his site for a lot of detailed information.
Download the file and unzip it into a directory that is easy for you to get to. For windows, we're going to stick the folder in My Documents in a folder called brother but if you are comfortable with command lines put it where-ever you'd like!

You will need Python installed to run the code. To see if you have Python installed, open up a command line and type in python. If you're running Windows you probably don't have it, so download it from the official Python site
Open up a command line (windows) or Terminal (mac) or xterm (linux) and cd to the brother directory and then type in ls (or dir if ls doesnt work) to list all the files

Determining the serial port
Now we need to figure out what the name of the FTDI cable is. This process differs a little for Mac, Linux and Windows people.
Under Mac, in the Terminal window, type in ls /dev/cu.* which should give the following responses or so

The name we are looking for is /dev/cu.usbserial-XXXX where the X's are going to be unique for each cable. Copy and paste the name into a text file so you'll remember it for later.
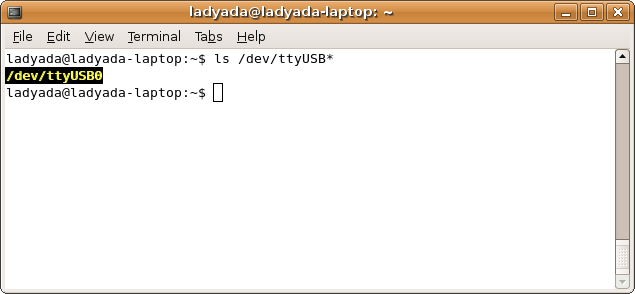
For Linux/Unix type ls /dev/ttyUSB* into a terminal window, you should see a device file called something like ttyUSB0
If you are using Windows, go to the Device Manager (From the Start Menu, select Settings→Control Panel. Double click on System and select the Hardware tab. Then click on the Device Manager button)

Backing up patterns/dumping memory from kh930e to computer
- Start up the disk drive emulator in the command line by typing in "python PDDemulate-1.0.py img COMPORT" where 'COMPORT' is your serial connection. For example on a mac the command might be "python PDDemulate-1.0.py img /dev/tty.usbserial-A7TKMHYD"
- When "ready" lamp is lit, clear display with CE key, then prepare to save pattern data to "disk" by typing 552, then STEP.
- Display will go blank and then "ready" and "pattern no" lamps will light up with the "track" number 1 in the display. Press STEP.
- Machine will beep when finished, and the track data will now be in the "img" folder along with your emulator and other scripts.
- The emulator also makes a handy file-01.dat file to make it easy to preview the patterns using dumppattern.py
Creating new patterns
Putting new patterns on the machine
- Start up the disk drive emulator in the command line.
- When "ready" lamp is lit, perform a memory reset by pressing CE key, then type in 888, then press STEP key.
- Clear display with CE key, then prepare to load new data into memory by typing 551, then STEP.
- Display should go blank, then "ready" and "pattern no" lamps should illuminate. Press 1 to indicate which "track" to load from the disk drive emulator, then press STEP.
- Machine will beep when finished. pick a pattern and knit as normal.
Troubleshooting
- If the RAM data has been corrupted, the screen will flash "888" and the machine will seem unresponsive. Hold down INPUT and STEP at the same time, and when the display should change. Perform a memory reset by hitting CE, 888, STEP.
Outside resources
- KH-930e manual - fill out a CAPTCHA to download the PDF manual
- Python pitfalls - helped spot a bug
- Troubleshooting Brother machines - includes how to do an 888 reset of memory
- Good forum post- includes what to do when all the machine will do is flash "888"
- Newton's Yarns - in Anaheim, CA, claims to carry Brother machines/accessories incl. KE-100 motor drive
